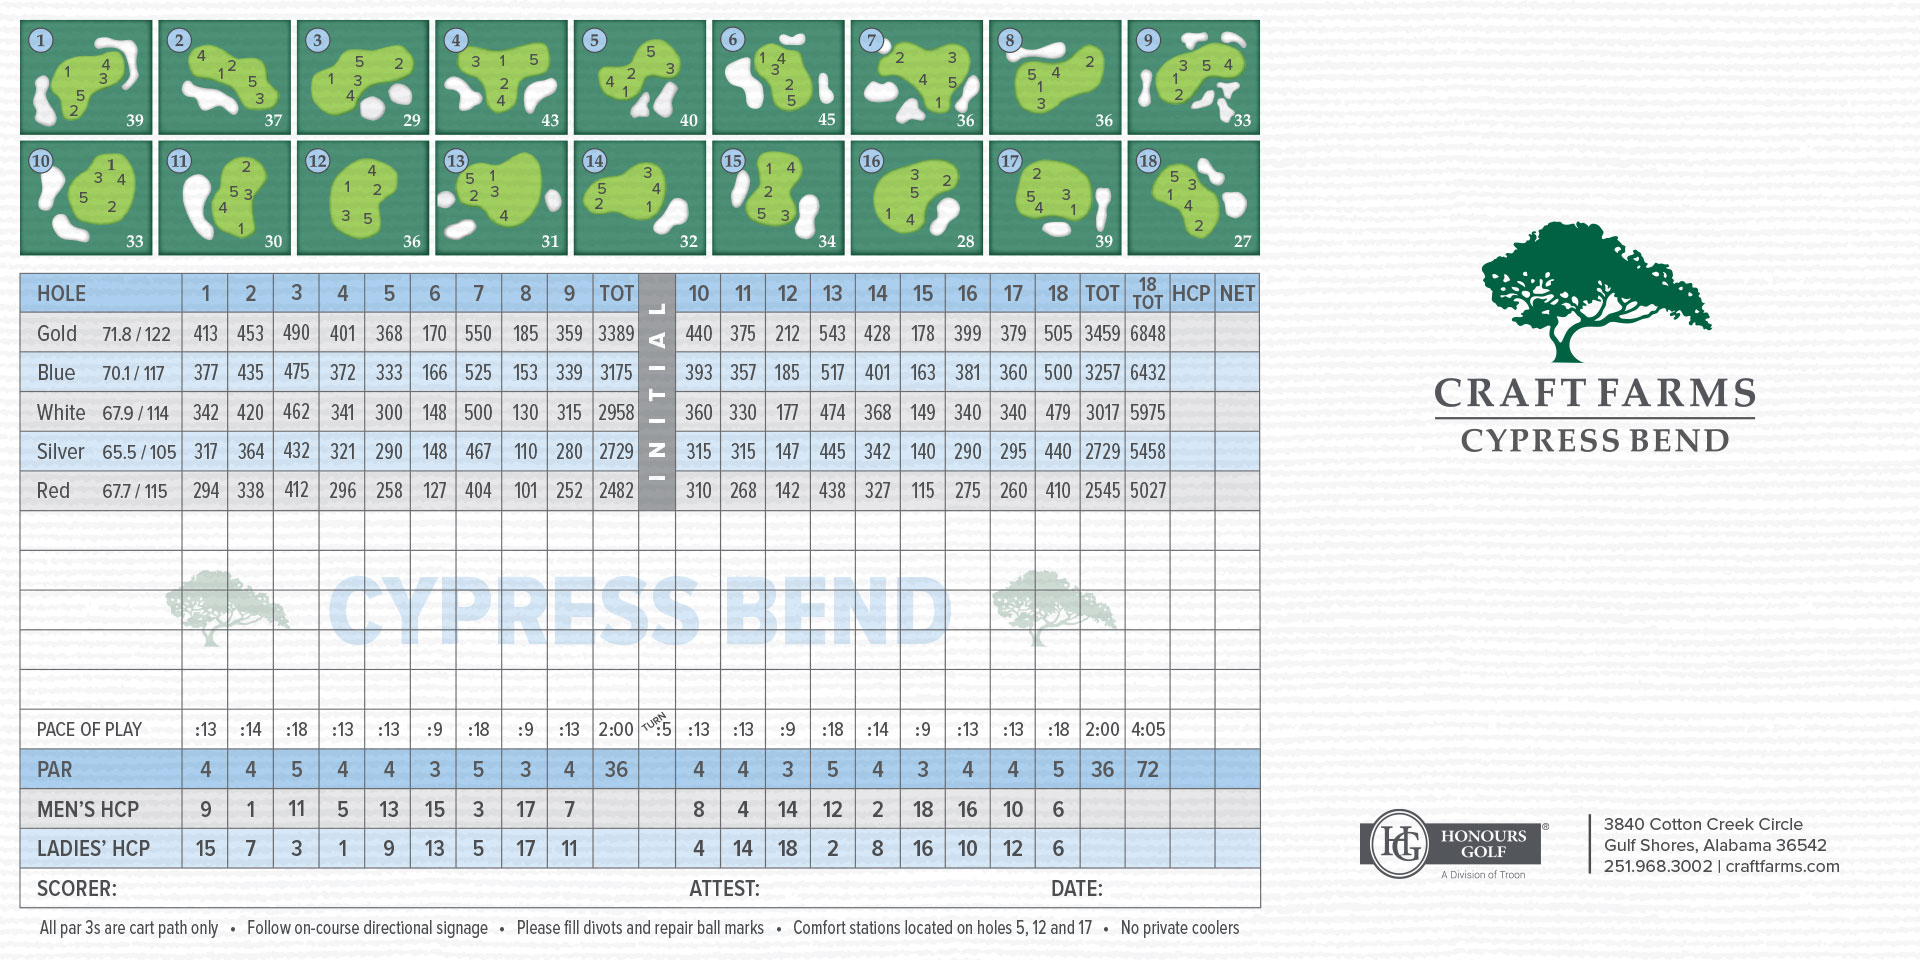
CYPRESS BEND COURSE
18 holes, Par 72
Designer: Arnold Palmer
Year: 1993
Cypress Bend at Craft Farms Golf Course boasts a 4-1/2 star rating by Golf Digest. This architectural masterpiece, features staggered tee boxes, sprawling bunkers, top quality putting surfaces and year–round lush conditions. A perfect complement to its big sister, Cotton Creek, this course has a coastal feel as it traverses a unique system of cord-grass accented lakes which come into play on nearly every hole. Cypress Bend offers wide fairways, vast landing areas and large undulating greens, giving golfers confidence as they prepare to tackle this Palmer creation.

The modern layout and links-style course is a pleasure to play! The 4th Hole is the trickiest on the course. You must have a well-placed tee shot and may not want to use your driver. The 2nd shot over water must be placed just right to score well on this hole.
CYPRESS BEND COURSE STATS

HOLE 1

HOW TO PLAY HOLE 1
With a slight dogleg to the right, the tee shot must avoid the two fairway bunkers that guard the right side. The second shot will require proper club selection because of the depth of the green. Bunkers guard this large green to the right and in back.
HOLE 2

HOW TO PLAY HOLE 2
This straight hole requires a tee shot that avoids fairway bunkers on the right side. A solid drive sets up an important second shot into a green that is guarded by a large bunker to the left and water to the left. The green slopes back to front with several hole locations that demand proper speed while putting.
HOLE 3

HOW TO PLAY HOLE 3
Don’t be fooled by the yardage! The tee shot needs to favor the right side to avoid the fairway bunkers on the left. A solid tee shot sets up the opportunity to reach the green in two. The lay up shot must be placed between bunkers that guard both sides of the fairway. Check the hole location for the approach shot to avoid the bunkers and water that guard the right side of the green.
HOLE 4

HOW TO PLAY HOLE 4
The tee shot needs to avoid bunkers on both sides of the fairway and the creek that runs diagonal across the hole. Club selection on the second shot is important to this t-shaped green. Bunkers guard the right and left front side of the green.
HOLE 5

HOW TO PLAY HOLE 5
With the easiest tee shot on the front nine, the large fairway allows plenty of space to let it go from the tee. The second shot must have proper distance to carry the green-side bunker that guards the front right side of the green.
HOLE 6

HOW TO PLAY HOLE 6
Club selection is important to place the ball well on this large, undulating green guarded by bunkers on both sides.
HOLE 7

HOW TO PLAY HOLE 7
This hole can be reached in three shots. The drive should avoid the right fairway bunker and out of bounds area to the left. A proper lay up shot must be placed between another set of bunkers about 100 yards out. Check the pin location on this undulating green that is guarded by bunkers to the front and right.
HOLE 8

HOW TO PLAY HOLE 8
A solid tee shot must carry to the green to avoid the steep bank in front and large lake. A bunker in the back of the green awaits the tee shot that travels too far.
HOLE 9

HOW TO PLAY HOLE 9
A solid tee shot must avoid the bunkers to the right and water to the left. The second shot must also carry three bunkers that guard the front right of this green.
HOLE 10

HOW TO PLAY HOLE 10
With a sharp dogleg to the right, a long tee shot over the fairway bunkers set up a mid-iron shot onto a large green guarded by a bunker in front and to the left.
HOLE 11

HOW TO PLAY HOLE 11
The tee shot must favor the right side to avoid the water along the left side of the fairway. The second shot is over water to a green guarded by a bunker on the left.
HOLE 12

HOW TO PLAY HOLE 12
This hole plays slightly uphill. Take an extra club to avoid being short. The large green slopes from back to front.
HOLE 13

HOW TO PLAY HOLE 13
With a sharp dogleg to the right, the green is reachable with an aggressive tee shot aimed over the large fairway bunker. The second shot must avoid water and bunkers on both sides of the fairway. The large green rewards players that attempt to go for the green in two.
HOLE 14

HOW TO PLAY HOLE 14
With a slight dogleg to the left, the tee shot needs to favor the right side to open the green for the second shot. The green is guarded by a bunker to the right and water to the left. This right to left, two-tiered green is large so proper club selection is necessary.
HOLE 15

HOW TO PLAY HOLE 15
As the narrowest green on the course, this Par 3 has a bunkers that guards the left side and the front.
HOLE 16

HOW TO PLAY HOLE 16
With a dogleg to the left, an aggressive tee shot over the left-side fairway bunker leaves a short iron to a green that has a severe slope from back to front.
HOLE 17

HOW TO PLAY HOLE 17
Favor the left side with the tee shot to avoid the water that runs down the entire right side. A large bunker in front of the green makes club selection important for the second shot. The large green slopes from back to front and is guarded by bunkers to the right and left.
HOLE 18

HOW TO PLAY HOLE 18
This great finishing hole demands a long, straight tee shot to avoid bunkers on the left and water on the right. The second shot must be well-placed to avoid the creek that runs in front of the green and if you decide to go for the green in two, make sure you use enough club to carry the creek. The green is guarded by two bunkers in the back and water to the left.